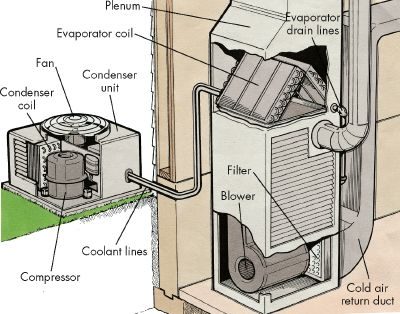
Central air systems split their labor between two distinct locations. Outside, on a concrete pad, sits the condenser. Inside, tucked into the plenum above your furnace, lives the evaporator coil. They are a team, but they don’t always cooperate.
Most homes rely on a forced-air distribution network. That means the same blower motor and ductwork you use for winter heat are doing double duty for summer cooling. It’s efficient infrastructure. But it’s also a point of failure.
Here is how the cycle actually works when everything is fine:
– Hot indoor air gets sucked into return-air ducts.
– The blower pushes that air across the cold evaporator coil.
– Chilled air travels through the supply ducts and enters your rooms.
Simple logic suggests that if the machine runs but the house stays warm, the refrigerant cycle might be dead. Maybe the compressor failed. Maybe the refrigerant leaked.
But consider the distribution system.
If the blower isn’t moving air, the coil can’t cool anything. If the ducts are leaking into an unconditioned attic, you are wasting cold air before it ever reaches a vent. The problem isn’t always the unit itself. It’s often the pipes carrying the air.
Think about your registers. Are they blocked by rugs? Is the filter clogged? A restricted filter starves the blower. The coil freezes up. The air feels warm because it’s barely moving.
When the air conditioner works but the house doesn’t cool, the problem is probably in the distribution system.
Before you call a pro to check the refrigerant pressure, look at the airflow. Check the ducts. Inspect the blower. The air has to get to you.
Central air isn’t one unit. It’s two. The condenser sits outside on a concrete pad. The evaporator coil hides above your furnace in the plenum. Both sides are sealed systems. You can’t just unscrew the casing and look inside. A professional handles the refrigerant. They handle the sealed components.
But you handle the dirt.
Don’t wait for the annual professional inspection to start paying attention. That checkup is important. It’s not enough. You can keep the system running at peak efficiency by handling the routine cleaning yourself. Just be careful.
Caution: Before doing any work, turn off the power to both the condenser and the evaporator assembly.
If the unit isn’t working right, check the chart first. It saves time. It tells you if you’re wasting money on a pro or if you can fix it with a wrench and some elbow grease.
Troubleshooting Common Cooling Issues
Most problems are simple. Power issues. Thermostat settings. Dirty coils.
If the condenser doesn’t run, check the breaker. Did a fuse blow? Trip the switch at the main panel. Restore the circuit. If the power is on, check the thermostat. Is it set too high? Lower it by 5 degrees. If it still doesn’t run, the motor or compressor is faulty. Call a pro.
If you’re getting uneven cooling, the duct system is probably out of balance. You need to balance it. If the whole house is warm, the unit doesn’t cool effectively. Why? Three reasons:
- Thermostat set too high. Fix: Lower it 5 degrees.
- Condenser coil is dirty. Fix: Clean the fins. Straighten them if they’re bent. Remove weeds, grass, and vines blocking airflow.
- Evaporator is dirty. Fix: Clean it.
If the condenser turns on and off repeatedly, it’s usually choking on debris. Clean the coil. Clear the area around the unit. If the evaporator is dirty, clean that too.
A dirty evaporator is the most common culprit for poor performance. Here is how you access it.
How to Clean the Accessible Evaporator Coil
The evaporator sits in the plenum above the furnace. It’s not always easy to get to. If your plenum has foil-wrapped insulation at the front, you can clean it. If it’s a sealed sheet metal box, stop. Do not open it. You need an accessible access plate.
Here is the step-by-step process for cleaning the coil yourself.
Step 1: Remove the Insulation and Access Plate
The foil insulation is usually taped in place. Peel it back carefully. You will need it later. Underneath is the access plate. It’s held by screws. Remove the screws. Lift off the plate.
Step 2: Brush the Evaporator
Use a stiff brush. Clean the entire underside of the unit. Use a large hand mirror to see what you’re doing. It’s dark in there.
If you can’t reach the back, slide the evaporator out slightly. It might have rigid pipes connected. Be careful. Do not bend the pipes. Just enough to get the brush in.
Step 3: Clean the Drain Pan
Condensation drips into a tray below the evaporator. This tray carries the water away. Pour one tablespoon of household bleach into the weep hole. This stops fungus growth.
In extremely humid weather, check the pan every other day. If there is standing water, the weep hole is clogged. Poke it open with a piece of wire.
Step 4: Reassemble
Put the unit back in place. Reinstall the plate. Tape the insulation back over it. Make sure it’s sealed tight.
Step 5: Test and Seal
Turn the air conditioner back on. Check for air leaks. If you hear hissing or feel air escaping, seal it with duct tape.
You might also need to clean the outside condenser to get full cooling power. The next section covers that.
Clearing the Outdoor Condenser Coil
The condenser unit sits outside. It takes a beating. Leaves. Grass clippings. Dust. All of it clogs the intake. The fan pushes air across the coil. If that airflow stops, the system chokes. You need to see which way the air moves before you start. Turn off the power first. Always.
Start with the ground. Cut back the weeds. Mow the grass low around the base. Vines are enemies here. They block airflow and hide damage. Once the debris is gone, you can see the coil.
Cleaning the Fins Without Breaking Them
Don’t just blast it with a hose. Water turns dirt into mud. Mud packs between the fins. It ruins the heat exchange. You need a commercial coil cleaner. Get it from a refrigerator supply store. Follow the label. Flush it out. Let it dry.
Next, tackle the fins. They’re light-gauge aluminum. Thin. Fragile. Use a soft brush. Be gentle. If a protective grille is in the way, remove it to reach the dirt.
Bent fins? Common. Fix them with a fin comb. These are cheap at appliance stores. The comb slides into the gaps. Straighten the metal. But be careful. One hard shove and you’re done. You’ll tear them.
Leveling the Concrete Pad
Check the foundation. The condenser needs to sit flat. If it’s tilted, the compressor oil drains wrong. The pump burns out faster.
Put a carpenter’s level on top. Check front-to-back. Side-to-side. If it’s off, the pad has settled. You can fix this. Use a pry bar or a 2×4. Lift the unit slightly. Force gravel or rocks underneath. Level it up. Simple.
Winter Protection
Fall is coming. Leaves will fall. They’ll get sucked in. Ice will form. Protect the unit. Use a commercial cover. It fits the shape. Or use heavy plastic sheeting. Secure it with sturdy cord. Not duct tape. Tape leaves residue. Cord holds.
When to Call a Pro: Refrigerant and Lines
If you clean everything. If you level the pad. If you comb the fins. And you still have no cool air? The problem is likely the refrigerant. Most systems use Freon. If it’s low, cooling stops.
Do not try to charge the system yourself. It’s dangerous. It’s illegal in many places if you aren’t EPA certified. Call a professional.
But you can fix the lines. Check the coolant pipes running from the outdoor condenser to the indoor evaporator. Look at the insulation. Is it torn? Worn? Missing?
Damaged insulation kills efficiency. Warm air hits the cold line. Energy waste. Replace it. ASAP. Buy insulation of the same type. Follow the manufacturer’s instructions. It’s not hard. Just tedious.
The Bottom Line
You know the difference now. Cleaning coils? DIY. Leveling pads? DIY. Replacing line insulation? DIY. Charging Freon? Not you.
Use these tips. Save money. Get the cool air flowing. If the thermostat is acting up, check that too. It’s often the culprit before you blame the AC. For other repairs, keep digging.