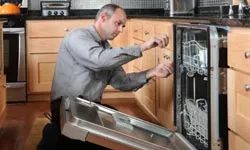
Stop treating your dishwasher like a black box you can’t touch. The control panels on modern units look like spaceship cockpits, which is convenient marketing for appliance repair shops. It’s not. The internal mechanics haven’t shifted much in twenty years. You can fix most of the common failures yourself. Save the cash.
Dishwashers operate on standard 110-120 volt power. They draw hot water directly from your water heater, not the cold line. Waste goes down the sink drain. If your water heater is set below 140 degrees, your dishes won’t get clean. Newer models preheat water, but if yours doesn’t, turn that heater up. The shutoff valve is usually under the sink or in the basement.
Safety First: Power and Water
This isn’t just a plumbing job. It’s electrical. And plumbing. You need to be careful.
Before you unscrew a single panel, kill the power. Unplug the unit. If it’s hardwired, go to the main breaker panel and trip the switch. Do not skip this step. Shock risk is real.
Turn off the water supply at the valve under the sink or in the crawl space. Disconnect the power cord. Remove the fuse if necessary. Now you’re safe to open it up.
What Can You Actually Fix?
Most homeowners think they need a pro for everything. That’s wrong. You can troubleshoot and fix issues like:
- Malfunctioning door latches
- Ineffective switches
- Unresponsive control boards (outside the sealed unit)
- Clogged filters
- Drain pump issues
You can replace these parts as a single unit. It’s often cheaper than paying a technician’s hourly rate. If you’re unsure if a part is dead, remove it. Take it to a local shop for testing. Get a quote. Decide then if you want to buy new or repair the old one.
Basic Operating Checks
Before you tear anything apart, check the basics.
- Water Temperature: Is the heater set to at least 140°F?
- Power: Is the breaker tripped? Is the plug seated?
- Water Supply: Is the valve under the sink open?
- Drain: Is the garbage disposal knockout plug removed? Is the drain hose kinked?
If these are fine, the problem is likely internal. That’s where the real work begins.
Tools and Parts You’ll Need
You don’t need a full mechanic’s kit. But you will need:
- Screwdrivers (Phillips and flathead)
- Needle-nose pliers
- A multimeter (for testing continuity)
- Replacement parts (specific to your model)
Check your model number. Order parts from reputable suppliers. Generic parts can save money, but they might not fit as well.
The Control Panel Myth
People avoid DIY repair because of the buttons. The interface looks complex. It’s just switches. Behind the panel, there are simple mechanical or electronic components. You can access them. You can test them. You can replace them.
Don’t let the intimidation factor win. The machine is simpler than you think. Start with the power. Then the water. Then the easy stuff. The harder repairs come later.
Next Steps
We’ve covered the basics. The safety. The simple checks. Now we dive into the components. The water inlet valve. The float switch. The pump. These are the heart of the dishwasher. When they fail, everything stops.
We’ll show you how to service each one. Step by step. No fluff. Just the work.
Ready? Turn off the power. Open the door. Let’s begin.
When your machine is silent, your first instinct is to panic. Stop. Breathe in. Most “broken” devices are simply caused by a loose wire or tripped circuit breaker. Before you call a professional, perform these five operational checks. They’re fast, free, and often solve the problem without you having to touch a screwdriver.
Step 1: Check the power supply
Start with the basics. Does it really work? If the dishwasher is plugged in, check that the cord is not frayed. Check the connector. Check the outlet yourself. Connect a lamp to it to confirm the power supply. If the outlet is controlled by a wall switch, make sure the switch is on.
Most built-in devices are not plugged into an electrical outlet. They are connected directly to your home’s electrical system. In this case, check the main switch panel. Look for a tripped circuit breaker or blown fuse. Return the switch to the “on” position. If your home is older, you may have a separate entrance for kitchen appliances. Look there too. Reset the circuit if it is open.
Step 2: Test the wall switch
If there is power in the circuit, but the machine still does not start, the outlet switch may be faulty. This is a common point of failure in older homes. For this you need a voltage meter.
Remove the switch cover plate. Be careful not to damage the screws. Place one probe of the tester in one port and the other probe in the opposite port. If the test light comes on, the switch is working. If it’s dark, the switch is off. Replace it with a new one of the same type. Don’t guess the current strength. Adjust the specifications.
Step 3: Check the door lock
The dishwasher is a safety device. It only works when it knows the door is closed. If the locking mechanism is worn or dirty, the safety latch will not lock.
Close the door tightly. Hold the latch firmly with your hand. While holding it down, press the start button or turn the control knob to “ON”. If your dishwasher suddenly starts working, you’ve found the culprit. The latch is faulty. It needs to be cleaned, tightened, or probably replaced. A dirty latch is easy to fix. A broken one is a part order.
Step 4: Check the water temperature and flow
Dishwashers need hot water. If the water heater is broken or set to too low a level, the dishwasher may refuse to start or stop mid-program to avoid damage to internal components.
Test the hot water in your kitchen sink. Let it run for a minute. Is it hot? If so, the water heater is probably fine. If the water is lukewarm or cold, check the water heater settings. If the water heater fails, the flow to the dishwasher stops completely. Some models have a built-in heater, but still depend on a hot water supply to reach the required disinfection temperatures.
Step 5: Check the control panel settings
Newer models use push button controls. These can be sensitive. Sometimes the button doesn’t register because it wasn’t pressed hard enough or the internal mechanism is stuck.
Check the control panel. Are the keys stuck? Are any of them stuck? Squeeze them with conscious force. If the indicator light does not light up or changes, the problem may be in the panel itself. But start here. It takes three seconds.
Disassembly for internal use
You have completed five tests. Nothing worked. It’s time to look inward.
Access to the working parts of most dishwashers is through the front door. You don’t have to rip the entire unit out of the cabinet. For many repairs, simply opening the door and touching component areas such as sprayers, screens, float switches, racks and door locks is sufficient.
Removing the control panel
To access the door control panel, you need to remove the mounting screws. These are often hidden. Look under the molding trim strips. These strips usually snap into a metal case. Pry them off with a hard bladed putty knife or screwdriver. Some models have a small setscrew that holds the molding in place. Remove it first.
The control knobs sit tightly on top of the shafts or are held in place by small setscrews. Gently pry them off. Some dishwashers require the entire front door to be removed to access the controls. This panel is attached to the door with screws on the inside edge of the back of the door. Use the correct size screwdriver to avoid stripping.
Access to motor and pump
In many models, after removing the control panel, the door panel itself can be removed by loosening the fasteners holding it in place. Also pay attention to the decorative moldings. Pry or slip them off.
To access the motor, pump, hoses, intake valves and other mechanical parts, remove the lower access panel. Usually you don’t need to remove the entire door to do this. The panel can be held in place with screws or lifted up and off the metal brackets. Take your time.
If your dishwasher is a portable model, tilt it on its back or side before removing panels. This enables a comfortable working position and prevents parts from falling into the mechanism.
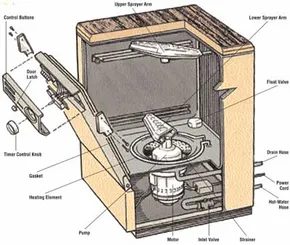
What’s inside?
Once inside, knowing the major parts and how they work will help you assess the problem. The next section covers door and switch repairs in detail. But now he was just hanging out in the dark room behind the door. You have to get your hands dirty.
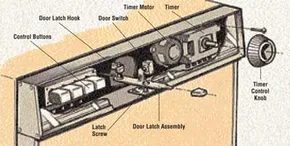
柜子下面积水? 洗碗机拒绝启动? 在致电专业人士之前,请先查看门组件。 这是最常见的故障点。 垫圈、门闩和开关协同工作以密封内胆并启动洗涤程序。 如果其中一个关闭,一切都会失败。 以下是如何诊断和修复主要组件。
更换门密封条
ドアの水漏れは通常、ガスケットが磨耗していることを意味します。 食洗機を開けてゴムパッキンを触ってみてください。柔らかいはずです。ひび割れたり、硬くなったり、脆くなったりした場合は交換してください。
新しいガスケットを慎重に取り付けます。ドアフレームへのフィット感を確認してください。隙間があってはなりません。膨らみはありません。ガスケットの位置がずれている場合は止めネジを調整してください。必要に応じて、クリップに再度取り付けます。 洗浄サイクルを実行します。漏れに注意してください。
まだ漏れていますか?ガスケットは正しく取り付けられていますが、ラッチが十分にしっかりと押し付けられていません。 ドアのラッチを調整する必要があります。目標は、ガスケットを押しつぶさずに適切な量の圧力を適用することです。 ラッチのネジを少し緩めます。ラッチを新しい位置にスライドさせます。締めてください。もう一度テストしてください。シールがしっかり締まるまで調整を続けます。
维修门锁
门闩受到撞击。 它打开和关闭数百次。 机械磨损会导致不对中。 闩锁可能会滑出位置。 门无法正常关闭。 由于安全开关保持打开状态,机器无法启动。
通常,您可以通过重新对齐闩锁来解决此问题。 松开安装螺钉。 用手指或钳子将闩锁滑入正确位置。 螺丝槽的设计就是为了允许这种移动。 关门。 检查对齐情况。 拧紧螺丝。
测试修复。 关门。 将控制旋钮转到“开”位置。 开始了吗? 如果没有,则闩锁机构本身已损坏。 更换它。 与旧闩锁完全一样地连接新闩锁。 可能需要几次打开和关闭循环才能正确就位。
### 检修门开关
The latch engages the switch. The switch tells the timer to start. Even if the latch is not in place or the switch is broken, the dishwasher remains silent.
Step 1: Manually lock the door. Keep the lever in the closed position. Turn the control to the “on” position. If the machine starts, the locking mechanism is out of position. Adjust the lock with a screwdriver. If it still won’t start, the switch may be faulty.
Step 2: Electrically test the switch. You need 万用表 (VOM). Set the RX1 scale. Remove the panel from behind the door. Disconnect one wire from the switch connector. 将万用表表笔夹在开关端子上。 close the door. If the meter points to zero, the switch is fine. If the reading is greater than zero, the switch is faulty. Change it.
Step 3: Install the new switch. match type. Connect the wires to the connectors exactly as you did on the old device.
### 检修浮子开关
A float switch 防止水箱过满。 It is at the 内胆底部。 If it becomes blocked, there is a risk of flooding.
Step 1: Open the door. Remove the bottom shelf. Locate the float valve. Stuck? 清除食物残渣。 Tap the top of the float with the handle of a screwdriver. This usually releases it.
Step 2: If tapping doesn’t work, remove the bottom panel. Find the float and switch. 使用万用表RX1档测试。 Disconnect the wire. 将表笔夹在端子上。 If the meter shows zero, the switch is fine. There may be a problem with the timer. If the measured value is greater than zero, the switch is damaged.
Step 3: Replace the faulty switch. 购买适用于您特定型号的配件。 Remove the fixing screws. Remove the old switch.
Step 4: Install the new switch. Connect the wires to the same connector. Attach it to the bracket.
### 检修定时器和控制开关
The timer controls the entire cycle. A bad timer can cause random glitches. it’s complicated. Don’t try to rebuild it. Please test first.
Remove the front panel. The timer is behind the knob. 断开一个端子接线。 Use VOM on RX1. 将表笔夹在端子上。 读数为零?定时器正常。读数不为零?更换它。
The same approach can be used with selectors and cycle switches. Wiring can quickly get complicated. If you are unsure about your electrical installation, contact a professional. 切勿随意猜测高压接线。
Be careful when changing timers or control switches. 请助手将新部件放在旧部件旁边。 Connect the wires one by one. Disconnect the old wire and install the new wire. This prevents connection confusion. 接线可能是摩擦配合的。 Remove with needle nose pliers. 切勿直接拉扯电线。 Disconnect the wires from the connectors.
take it easy If even one wiring is incorrect, the control board may burn. Double check each connection before turning on the power.
Slide the new timer into place. Fix it with the same fixings as the old device. Open the control panel again. Click the buttons into place.
If your dishwasher refuses to fill or leaves dishes wet, the problem is usually with the fill valve or the heating element. Both components are common sources of error. Filling and heating water should be simple. If not, there is a specific mechanical or electrical fault. Next, we explain exactly how to test these parts.
水流。 这是清洁负载的命脉。 当您的洗碗机无法装满水,或者洗出来的餐具仍然是湿的时,问题通常就隐藏起来了。 您不需要管道学位来诊断这些故障。 您只需要一个万用表、一些耐心以及愿意深入了解内部情况的意愿。
Water valve troubleshooting
The water supply valve regulates the water entering the tub. It can be controlled by a timer or activated by a solenoid valve. If your machine is dry when it should be wet, start with the basics.
**Check the supply. ** Make sure the water valve on the back of the device is open. If the water heater is turned off, the dishwasher will not dispense water.
**Inspect the timer. ** If water is supplied and the heater is on, the timer may be to blame. If the timer works correctly, there is a problem with the inlet valve.
**Clean the screen. ** Look for the valve under the tub. Internal filters are often blocked by mineral deposits. Use a screwdriver to pry out the screen. Rinse with running water. Reinsert it. This will fix more blockages than you expected.
**Tap the solenoid. ** If the valve is controlled by a solenoid, it can be mounted on the side. Use the handle of the screwdriver to tap lightly to release the jammed mechanism. Try running the cycle again.
Test with a VOM. ** If still not filling, use a volt-ohm-milliammeter set to RX1. Disconnect one of the wires from the solenoid valve. Clip the probes to the terminals.
* 100 to 1000 ohms: Solenoid is OK.
* More than 1,000 ohms:** The solenoid is dead. Replace it with an identical unit. Connect the new one exactly like the old one.
Worn or bent valves cannot be repaired. Must be replaced. Disconnect the water pipe, remove the fixing screws and replace the parts. Reassemble in reverse order.
Drain Valve Considerations
Not all dishwashers have their own drain valve. These are typically found on models with non-reversible motors. If you have it and it fails, stop. Call a professional. Do-it-yourself repairs are risky and often ineffective.
Heating element diagnosis
The heating element is located around the bottom of the screen. It looks like an oven coil. Its function is to dry. It rarely breaks, but if it does, it burns completely.
Step 1: Remove the bottom panel. Disconnect one power cord. Set the VOM to RX1. Clip the probes to the element terminals.
* 15-30 ohms: The element is healthy.
* Over 30 ohms: It’s faulty. Replace it.
Vaihe 2: Hanki uusi elementti. Remove any nuts or fasteners holding the old nuts in place. Remove the connector screw. Pull the old filter out of the tub. It can stick to ceramic spacers or retainers, but it can be passed through.
Slide the new element into place. Reconnect the power cord. Secure the fasteners.
洗涤剂分配器问题
旧洗涤剂会结块。 它粘住了触发翻转托盘的弹簧。 它减慢了枢轴动作。 如果分配器无法打开,请首先检查是否有物理障碍物。 餐具是否接触托盘? 架子是否挡住了秋千?
检查托盘本身。 裂纹很常见。 如果剩余的清洁剂是液体而不是潮湿的,则托盘可能会受到损坏。
更换整个分配器单元通常比尝试拆解旧分配器单元的部件更容易。
使用制造商特定的替代品。 螺钉可能位于前面板上或隐藏在门板后面。 拆下旧装置。 安装新的。 与之前连接的接线完全一样。
碗碟架维修
架子坏了是因为人们堵塞了架子。 他们load them up, then shove them back into the tub with brute force. This cracks rollers. It throws racks off their tracks.
Stop doing that.
To remove a rack, pull out the small metal pins securing it to the tracks. Or simply lift and pull. Reinstall it so it rolls smoothly.
Fixing rollers:
* Friction-fit: Pull them off. 更换同类型的新产品。
* 弹簧夹: 使用钳子或螺丝刀尖将夹子撬出。 拆下滚筒。
如果无法卸下滚轮,请更换整个机架。
嘈杂的洗涤周期和排水问题是下一个合乎逻辑的步骤。 接下来我们将解决那些与水有关的头痛问题。
The Heart of the Clean: Servicing the Water Pump
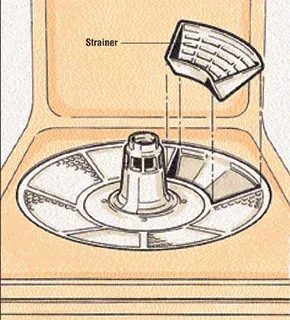
You’ve scrubbed the arms. You’ve cleared the strainer. You’ve tightened the leaks. Now, let’s talk about the muscle. The water pump.
If your dishes come out spotless from the top but greasy from the bottom, the lower spray arm isn’t getting pressure. Why? Often, the pump impeller is the culprit. It’s not a complex machine, but it’s vital. And when it fails, it fails loud.
Diagnosing Pump Failure
Before you tear into the cabinet, rule out the simple stuff. Is the filter clogged? Is the spray arm blocked? We covered that. If water is entering the tub but not circulating, the pump motor might be dead. Or the impeller could be jammed.
Listen closely. A humming sound without water movement? That’s a seized impeller. A complete silence? Dead motor. A grinding noise? Bearings are shot.
Removing the Pump
Safety first. Unplug the unit. Shut off the water supply. Yes, even for this. You don’t need water pressure while your hands are near live wires and sharp metal edges.
Most dishwashers hide the pump at the bottom, under the tub. You’ll need a screwdriver. Usually Phillips. Sometimes flathead. Remove the kickplate at the bottom of the door. Remove the lower spray arm. Remove the filter assembly. This exposes the pump housing.
Be careful. There are often wires connected to the pump motor. Note their positions. Take a photo. Electrical connectors can be brittle. They snap if you’re rough.
Disconnect the drain hose. Disconnect the inlet hose if it’s attached to the pump assembly. Label them if they look identical. You’ll thank yourself later.
The Impeller Check
Once the pump is loose enough to pull out, check the impeller. This is the fan-like blade inside the pump housing. It spins to push water up the tubes.
If it’s clogged with glass shards, bone fragments, or hardened detergent, remove it. Use needle-nose pliers. Gently pull the impeller off the motor shaft. Don’t force it. If it’s stuck, wiggle it. Don’t hammer it. Plastic impellers shatter.
Clean the housing with a brush. Remove any debris. Reinstall the impeller. Snap it back onto the shaft. It should spin freely. If it drags, replace it. Impellers are cheap. Motors are not.
Replacing the Motor
If the impeller spins freely but the pump still doesn’t run, the motor is likely dead.
Order the exact replacement part. Dishwasher models vary wildly. A part for one brand might not fit another. Check the model number on the door frame. Look it up. Buy the OEM part if you can. Aftermarket parts are cheaper but often fail faster.
Remove the old motor. It’s usually held by three or four screws. Disconnect the wiring harness. Some motors have a ground wire. Don’t lose it.
Install the new motor. Reverse the removal steps. Tighten the screws snugly. Don’t overtighten. You’ll strip the plastic housing. Reconnect the wires. Ensure they’re locked in place.
Testing the Repair
Plug it back in. Turn on the water. Run a short cycle. Watch for leaks. Listen for unusual noises.
If it hums but doesn’t spin, you’ve got a capacitor issue or a jammed impeller. Double-check your work.
If it runs quietly and sprays water, you’re done.
But what if it leaks from the pump seal? That’s a different story. Seals degrade over time. Heat. Detergent. Age. If water is seeping out of the pump body itself, you can’t just tighten a bolt. You need to replace the seal or the entire pump assembly.
This gets complicated. It involves disassembling the pump housing. It involves dealing with dried soap scum and rust. It’s messy.
Consider calling a pro if you’re not comfortable with this level of disassembly. Or, if you’re handy, take your time. Clean everything. Use a new gasket if one is provided. Lubricate the shaft with food-grade silicone grease if recommended.
The Reality of DIY
You can do this. But don’t rush.
Dishwashers are simple machines. But they’re enclosed in a tight space. Access is limited. Visibility is poor. You’ll be working in the dark, with your arm twisted at an awkward angle.
Prepare your workspace. Good light. A magnetic tray for screws. A bucket for residual water.
And remember: if the motor is truly dead, and the unit is old, the cost of the part plus your time might exceed the value of the dishwasher. Check the age. If it’s over 10 years, consider replacement. New models use 30% less water. They’re quieter. They clean better.
But if it’s a five-year-old workhorse? Fix it. It’s satisfying. It saves money. And you’ll know exactly what’s inside.
One last thing. When you put it all back together, run a rinse cycle first. Check for leaks. Then, run a full wash. Check the dishes.
If they’re clean, you did
拆卸和清洁水泵
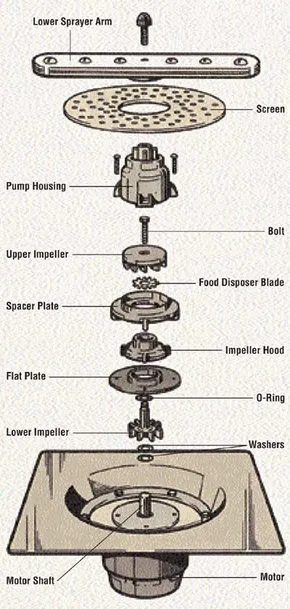
洗碗机清洁循环的核心是水泵,通常隐藏在下喷淋臂下方。 它通过两个叶轮(顶部和底部)将水推过系统。 随着时间的推移,食物颗粒和洗涤剂残留物会堵塞这些部件,从而降低机器的效率。 如果您小心操作,清理它们是一个简单的过程。
拆解步骤
首先拔下固定喷雾臂的盖子。 一旦消失,拆下喷雾臂本身,然后拆下过滤网。 从那里,您需要取出泵壳和固定螺栓。
然后核心组件就会暴露出来。 您应该拆下上叶轮、食物处理器叶片、隔板、叶轮罩、平板、O 形圈,最后拆下下叶轮。
布局在这里很重要。 按照拆卸顺序准确地放置每个部件。 这种视觉图可以显着减轻重新组装的压力,并防止您混淆外观相似的塑料件。
清洁和检查
将拆下的部件浸泡在温和的清洁剂溶液中。 擦掉任何积聚的污垢或堵塞物。 仔细检查每一件作品。 如果您发现裂纹、变形或过度磨损,请勿尝试修补它们。 购买专为您的洗碗机型号设计的替换零件。
在此阶段更换所有密封件。 旧的 O 形圈和垫圈是防止未来泄漏的廉价保险。 在将任何东西重新组装在一起之前安装新的。
按照与拆卸相反的顺序重新组装泵。 保持零件井井有条。 O 形圈放错位置或叶轮安装不正确可能会导致泄漏或洗涤性能不佳。
排水问题和电机问题
The lower impeller also acts as a drain pump in some models. These systems usually use reversible motors. Some rely on non-reversible motors combined with 机械排水阀.
If the dishwasher does not drain, the cause may be a blocked lower impeller. Cleaning it will solve the problem completely. If water remains after cleaning, the motor may be faulty or the valve may be stuck. In this case, avoid DIY repairs and contact a professional.
Engine repair is usually not a do-it-yourself project. The risk of electric shock and seal damage is very high. However, before handing the job over to a technician, make sure of two things: 定时器是否真的在运行? Does your dishwasher have power in the socket? If the engine still does not run after these basic checks, it must be professionally replaced.
Prevent future headaches
Soap stains, noises and leaks don’t have to disturb your daily kitchen routine. With regular attention, the most common problems can be solved.
Do not place any obstacles in the spray arm. Check the door seal for debris. Check regularly for leaks. These small habits can prevent costly breakdowns.
Frequently Asked Questions
How can I prevent these problems from happening again?
Regular maintenance is important. Clean the 喷淋臂 regularly. Wipe the door seal. Watch out for small leaks before they turn into floods.
When should I contact a professional?
If you’ve tried the basics and your dishwasher won’t drain, leaks or still malfunctions, it’s time to call in a professional. Persistent problems often indicate a serious mechanical failure that cannot be fixed with DIY tools.