Winter leaves scars. You look out the window after the thaw and see the new cracks in your front walkway. Spring brings rain that proves your basement is a sponge. And the garage floor? It’s just gray, stained, and ugly. No matter the season, something in the house is broken or looking tired.
Hiring a pro for these fixes is expensive. A simple re-seal or patch job can cost a small fortune. But you don’t need a crew to fix concrete. You just need the right materials.
Quikrete makes this possible. It turns heavy construction into a manageable weekend project. The brand offers pre-mixed solutions for repairing structures or coating surfaces. It’s cheap. It’s fast. And for the right homeowner, it’s entirely doable.
Why Quikrete Changes the Game
Concrete is basically cement, water, and aggregate like sand or gravel. It’s the most common building material on earth because it’s cheap and tough. It resists fire, rot, extreme weather, and wear. It’s also moldable and comes in colors.
The problem? Traditional concrete is a pain. It’s heavy. It takes days to cure. You need a mixer truck. You need a crane if you can’t get the truck to the pour site. You need labor. You need money.
Quikrete solves the logistics.
Quick-setting Quikrete products can set in as little as 10 minutes. Larger projects usually take 20 to 40 minutes to set. You can buy it in 60-pound bags or bulk bins. You mix it. You pour it. You finish it. All in one afternoon. No rental equipment. No contractors. Just you, a shovel, and a deadline.
How to Mix Quikrete for the Best Texture
Mixing concrete yourself is hard work. But mixing Quikrete is just harder work than digging a ditch.
There is a general rule for the ratio: one part water for every five parts of dry mix.
But numbers are suggestions. The real goal is consistency. You want the texture of modeling clay. It should hold its shape but still be pliable.
Start with the dry mix in a wheelbarrow or on a clean surface. Add water slowly. Mix it. Test it. If it’s too thick, add a splash of water. If it’s soupy, add more dry mix. It’s like perfecting oatmeal. You adjust until it feels right.
Once it’s ready, you can use a small garden shovel for touch-ups. For larger areas, you’ll need a trowel or a float. The key is speed. Once the chemical reaction starts, you don’t have much time to adjust.
“The general rule for achieving a good Quikrete texture is to use one part water for every five parts of mix. For the best results, it should have the consistency of modeling clay.”
The Cretesheet Hack
Stirring concrete by hand sucks. It’s back-breaking. It’s messy. It’s easy to do wrong.
John Shoemaker invented the Cretesheet to fix this. It’s a 4×4 foot square of tough plastic with handles on all four corners. It costs less than $20.
Here’s how it works:
1. Lay the sheet flat.
2. Pile the dry Quikrete in the center.
3. Add the measured water.
4. Grab the handles.
5. Lift and lower the sheet.
The material folds over itself. It mixes thoroughly without you touching the chemical sludge. You and a partner can do it together. It’s cleaner. It’s faster. It saves your back.
Choosing the Right Quikrete Coating
Raw concrete is porous. It absorbs water. It stains. It fades. Once your Quikrete project is cured, you need to seal it. A coating protects against chipping, fading, and daily wear. It also makes cleaning way easier.
You need to match the product to the location. Not all sealers are the same.
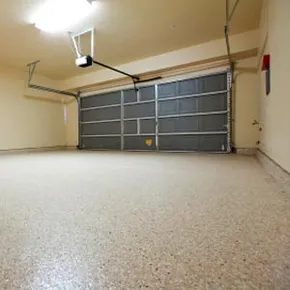
Epoxy Garage Floor Coating
This is the heavy hitter for driveways and garages. It resists oil stains, tire marks, and impact. It’s designed for interior concrete but can handle the abuse of a vehicle.
Epoxy Multi-Surface Coating
Use this for patios, walkways, and interior floors. It strengthens the surface and seals it against moisture. It’s versatile enough for both inside and outside use.
Premium Clear Epoxy Coating
Best for interiors where you want to preserve the look of the concrete. It also performs well in garages if you don’t want the colored tint of standard epoxies.
Epoxy Industrial Floor Coating
This is overkill for most homes, but great for workshops with heavy machinery. It handles the harshest conditions.
Anti-Skid Textured Coating
Essential for pool decks and exterior stairs. Standard epoxy is slippery when wet. This adds texture to prevent slips and falls.
Other Sealing Options
If epoxy feels too permanent or expensive, Quikrete offers other sealers:
- Basement & Concrete Floor Paint: Good for basement floors where moisture is a concern.
- Garage Floor Sealer: A lighter duty option for lighter traffic.
- 1-Part Epoxy Garage Floor Sealer: Easier to apply than two-part epoxies, but less durable.
- Multi-Surface Concrete Sealer: A general-purpose sealer for various indoor and outdoor projects.
- Natural Look Water-proofer: Doesn’t change the color. Just blocks water.
- Wet Look High Gloss Sealer: Makes concrete look darker and shinier. Enhances color.
- Etching Stain High Gloss Sealer: Adds color and protection in one step.
- Exposed Aggregate Sealer: For decorative concrete where stones are visible.
A Quick History of the Stuff
It helps to know what you’re holding. Portland cement was invented in England in 1824. The name comes from the Isle of Portland, where a stone resembling the mixture was found.
They mixed limestone, clay, or shale with sand or iron ore and water. The result was a substance that got harder over time. It became the backbone of modern construction.
Today, you’re holding a bag of that same chemistry. The difference is that Quikrete has pre-measured it for you.
You can walk into any big box store and see the variety. The question is whether you’ll buy it, or keep watching your driveway crack.
What Lies Beyond the Pour
You’ve mixed the bag. You’ve poured the slab. The trowel is resting against the wheelbarrow, your back is stiff, and the smell of curing cement hangs in the air. Most guides stop here. They tell you to keep it wet, cover it, and walk away. That’s where the real risk begins.
If you think the hard work ends when the concrete sets, you’re missing half the battle. The next phase determines whether your DIY project lasts a decade or cracks within a year. This isn’t about magic. It’s about chemistry and patience.
The Curing Myth
Curing is not drying. It’s a chemical reaction called hydration. Water reacts with the cement particles to form a crystalline structure. If the water evaporates too fast, the reaction stops. The result is weak, dusty concrete that flakes under pressure.
You don’t need expensive sprays. You need time and moisture.
Keep the surface damp for at least three to seven days. Use burlap, plastic sheeting, or a simple water mist. Avoid direct sunlight during peak heat. Wind will steal your water faster than you can replace it.
When Can You Walk on It?
This is the question everyone asks. The answer depends on temperature and humidity.
- 24 hours : Light foot traffic is usually safe.
- 48 hours : You can move light tools.
- 7 days : The slab reaches about 70% of its design strength.
- 28 days : Full structural strength.
Wait before placing heavy items. A car on a fresh driveway? That’s a recipe for permanent tire marks or surface scaling. Give it a month if you can. If you’re impatient, at least wait two weeks.
Sealing the Deal
Sealing isn’t mandatory. It’s insurance. A good penetrative sealer blocks water, oil, and salt from entering the pores. It doesn’t change the color much, but it makes cleaning easier and prevents freeze-thaw damage in colder climates.
- Clean thoroughly : Remove all dust and debris. A broom isn’t enough. Use a stiff brush or a pressure washer on a low setting. Let it dry completely.
- Apply the sealer : Use a roller or sprayer. Work in small sections. Don’t overlap wet edges or you’ll get streaks.
- Watch the weather : Don’t seal if rain is forecast within 24 hours. Temperature should be between 50°F and 90°F.
Common Mistakes to Avoid
Skipping the control joints. If you didn’t cut them in during the pour, it’s too late. But if you did, respect them. These are planned weak points that guide where the concrete cracks. Ignore them, and random cracks will appear elsewhere.
Using the wrong mix. Not all concrete is created equal. Garage floors need higher PSI. Sidewalks don’t. Using a walk-mix for a heavy-duty garage floor means you’re asking for trouble. Check the bag. Look for “4000 psi” or higher for driveways.
Ignoring the slope. Water must run off. If it pools, it will seep into the sub-base, freeze, and heave. Even a slight grade (1/4 inch