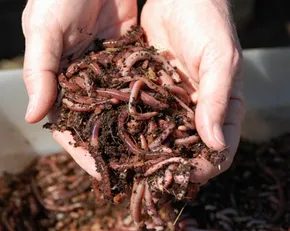
They are pink. They are slimy. They are hungry.
You probably don’t think about them when you’re walking your dog or digging in the garden. But beneath your feet, they are working. Aristotle called them the intestines of the world. Ancient Chinese texts called them angels of the soil. The truth is somewhere in the middle. They are tiny, formidable forces. They eat organic matter and leave behind rich humus.
This process is called vermicomposting. It uses worms to turn trash into fertilizer.
Why bother with worms instead of a regular compost pile? Speed. And quality.
Worms can consume up to half their body weight in food daily. That is a lot of garbage. The result is a dark, nutrient-rich soil amendment that beats a traditional pile any day. Plus, there is a certain joy in saying, “Worms eat my garbage.” It sounds like a superpower.
But not all worms are created equal. You cannot just dig up any worm from your backyard and dump it in a bin. You need the right species. You need to know the population math. Yes, population math.
Are there male and female worms? How many do you actually need? The answers might surprise you. Where do you even buy them?
Let’s start with the most common choice for beginners.
The Red Wiggler: Your Best Bet for DIY Vermicomposting
When people ask which worms to use for home composting, the answer is almost always the same. The red wiggler.
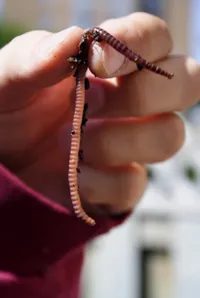
Scientific name: Eisenia fetida.
Common name: Red wiggler.
This is the worm of choice for vermicomposting. It is not the same as the earthworm you see after a rainstorm. Earthworms (like the common garden worm, Lumbricus terrestris ) live deep in the soil. They burrow. They are not suited for a bin. They will try to escape.
Red wigglers live in surface debris. They thrive in rotting organic matter. This makes them perfect for a container.
Why choose red wigglers?
- High Reproduction Rate: They breed quickly. A healthy population grows fast.
- Temperature Tolerance: They handle the temperature fluctuations of a garage or basement better than other species.
- Surface Dwellers: They stay near the top of the bedding, where the food is.
You do not need a complex gender ratio. Red wigglers are hermaphrodites. Every worm has both male and female reproductive organs. They still need a partner to exchange sperm, but you do not need to separate them. You just need a group.
How Many Worms Do You Need?
Start small.
For a typical household bin, you do not need hundreds of worms. You need enough to handle your daily food scraps. A good starting point is one pound of worms.
One pound contains roughly 1,000 worms.
This amount can process about half a pound of food scraps per day. If you are a small household, that is plenty. If you have a large family and generate lots of vegetable peels, you may need more. But start with one pound. You can always order more
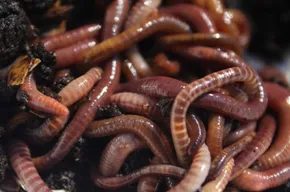

You probably don’t want random worms wiggling through your kitchen cabinets. Stick to red wigglers. That is Eisenia foetida. These are the best compost worms for indoor bins. They thrive in tight, crowded spaces. They do not burrow deep into the earth like night crawlers do. In the wild, you will rarely see them heading underground.
Where to Buy Composting Worms
If you are ready to start a bin, you need a supplier. Bait shops sell red wigglers. They are popular for fishing bait. You can buy them in small tubs. The price is high for the quantity you get. It is not worth it.
Go online instead. Find a reputable worm farm. They sell by the pound. Knowing your exact weight matters. You should pay about $20 per pound plus shipping. If anyone charges more, they are ripping you off. You can also ask a neighbor who composts. They might give you a starter population.
Your worm count will double every 90 days or so. That is a sign they are healthy. Just weigh them before you add them to the system.
Why Weighing Worms Matters
Fat worms are good worms. Red wigglers eat about half their body weight in food daily. This ratio dictates your bin’s success.
One pound of worms equals roughly 1,000 individual worms. If you put one pound of worms in your bin, feed them half a pound of food each day. That is eight ounces.
To figure out how many worms you need, track your waste. Weigh your organic garbage for a week. Find your average. Buy twice that amount in worms. If you toss one pound of scraps daily, start with two pounds of worms.
Worm Reproduction and Life Cycle
How long do worms live? Reports vary wildly. Some say a few months. Others claim up to 10 years. They will reproduce regardless. You do not need to worry about gender ratios. They are hermaphroditic. Each worm has both male and female organs. It still takes two worms to reproduce, though.
Look for the clitellum. This is the dark red band around the worm’s neck. It appears when they are sexually mature. Every few months, these mature worms cluster into a giant, squirming ball at the bottom of the bin. This is a signal. Put up a “Do Not Disturb” sign. Leave them alone to multiply.
What Is Biodegradable?
You might toss an apple core out the window and call it biodegradable. The process starts immediately. Oxygen and environmental factors break it down. Once it hits the ground, critters start nibbling. Worms, flies, and insects arrive to eat their share.
These decomposers digest the material. They turn that apple core into topsoil. It is a cycle. Vermicomposting mimics this process indoors.
Building Your First Bin
The next step is construction. You need a container. It must be dark and moist. The process of building your own vermicomposting bin is straightforward. You do not need fancy equipment. Just the right materials.
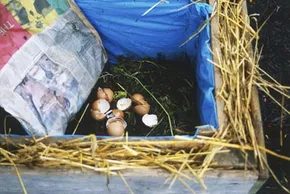

You don’t need a fancy, multi-tiered, self-sifting ventilation system that costs hundreds of dollars to start vermicomposting. You can build a bin from scratch or just grab a plastic tub and poke holes in it. Seriously, the only limit is your imagination. I built the community composting system at Common Ground Athens in Georgia out of a salvaged bathtub. It worked. But if you want the best results for temperature and moisture control, stick with wood.
When you are designing your setup, keep three rules in mind:
- Go wide and shallow. Surface area matters more than depth.
- Punch holes in the bottom for airflow.
- Keep the sides low to help with ventilation.
If you follow these steps, your worms won’t escape. They are non-migratory. They stay put if conditions are right. They hate light, too. Open the bin during the day and any worms at the top will dive down into the darkness. They have no reason to leave if you provide food and comfortable bedding.
If you are still paranoid about escapees, line the air holes with mesh wire. Even if you trust your red wigglers completely, keep a lid with holes on the bin. Add a layer of black plastic over the bedding with air holes cut into it to block light and keep pests out.
Preparing the Bedding
The next step is bedding. Shredded paper and leaves are your best friends here. This means you can compost office paper along with kitchen scraps. The bedding needs to be damp, not soggy. Worms breathe through their skin. If it is too wet, they drown. If it is too dry, they suffocate.
Here is how to get the moisture right:
- Fill a bucket with water.
- Dunk handfuls of bedding in.
- Squeeze them out until they are barely dripping.
- Pull the material apart before putting it in the bin.
This creates air pockets and passageways. Add a couple of handfuls of dirt and leaves from your yard. You need grit. Worms have gizzards that require grit to grind up food. Soil and coffee grounds work well for this.
Choosing a Location
Where do you put the bin? Anywhere safe from animals and extreme temperatures. A basement, patio, or kitchen all work. If you bury your food properly below the bedding, the only smell should be fresh, damp earth. A healthy system does not smell. It does not attract flies.
Worms can freeze or burn. Keep the bin between 40 and 90 degrees Fahrenheit (4.4 to 32.2 degrees Celsius). If the temperature drops or spikes, move the bin indoors.
Adding the Worms
Once your location and bedding are set, add the worms. Give them a day or two to adjust to their new home. Do not feed them immediately. Wait until they seem comfortable. Then you can start introducing food.
You might wonder which foods help them thrive and which ones will kill them. That is a conversation for the next section.
Killing Identity Theft with Compost
Red Wigglers are not just composting machines. They are also crusaders against identity theft.
Use shredded paper as your primary bedding material. Shred bank statements, credit card receipts, and old account numbers. Feed them to the worms. They will chew up the paper and turn it into compost. No landfills required.
Worm Compost Food and Established Bins
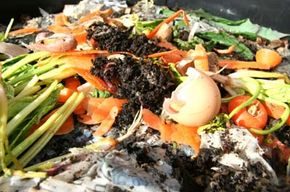
Feeding your red wiggler colony is where the real magic happens. You can toss in just about anything that once grew in the dirt. Coffee grounds and filters? Yes. Tea leaves and bags? Absolutely. Fruit scraps, veggie peels, rice, grits, and natural fabrics like cotton are all fair game. Washed and crushed eggshells are also a smart add. They provide calcium, which helps the worms’ digestive systems run smoothly.
Here is what stays in the bin:
- Leafy greens
- Potatoes
- Non-acidic fruits and vegetables (tomatoes, green peppers)
- Low-acidity citrus
- Coffee & tea grounds
- Rice
- Grits
- Paper
- Cotton
- Eggshells
But there is a hard line you do not cross. Do not feed them fatty or oily items. Worms cannot digest meat proteins or lactose. That means no milk, cheese, or butter. If you have an egg in your hand, remember this rule: the shell is fine. The egg itself is not. It will rot and create ammonia fumes that kill the colony.
Citrus and salt are also poison. Worms breathe through their skin. Imagine having your lungs on the outside of your body and someone rubbing salt and lemon juice on them. You would be in shock. They would be too. Highly acidic foods like lemons, limes, and oranges can burn their skin. So can hot peppers.
Avoid these items at all costs:
- Butter
- Oil
- Salad dressing
- Eggs (the contents, not the shell)
- Meat
- Highly acidic fruits and vegetables
- Hot peppers
- Salt
- Animal waste
- Plastic
- Synthetic materials
- Insecticides
Once you have lived with your bin for a while, you will develop an intuition. You will know how much they can handle. You will know when to stop. If the bin starts to smell, you have made a mistake. Usually, it is because you are overfeeding them. They cannot keep up with the pile. Or, you are not burying the food deep enough into the bedding. Burial masks the scent and prevents pests.
A healthy, established bin will start to teem with life. Worms reproduce quickly. You will also attract other decomposers. Seeing bugs in the bin is normal. It is a sign of a working ecosystem. Do not panic. If you see a swarm of flies, then you have a problem. Flies mean the food is exposed. If you keep the lid on and bury your scraps, you will not have to deal with maggots. These extra insects are allies. They break down waste faster, allowing you to compost more organic matter.
Watch for tiny white sacs that look like maggots. They are not maggots. They are worm egg sacks. Or baby worms. Your population should double every three months. When it does, you have a decision to make. You can build a new bin and split the colony. This gives them more room. It also gives you more castings.
If you feel overwhelmed by the sheer number of worms, you have options. You can teach your neighbors how to compost and give them a starter culture. You can release them into the wild, though this is wasteful. Or you can use them as fishing bait. They are excellent for trout.
We have saved the best for last. Your worms can produce black gold. The fertilizer they create is incredibly valuable.
Black Gold and Commercial Composting
Consider the Len Foote Hike Inn in the North Georgia mountains. It is a hotel with an extensive vermicomposting system in the basement. Guests help the staff process 1,500 pounds (680.4 kilograms) of food and office waste every year. The resulting fertilizer goes into their organic garden.
The staff gets creative. They shred safe materials to feed the worms. One famous story involves a pair of corduroy pants left behind by a guest. The staff shredded them and buried them. They never saw the pants again. One day, while sifting the compost, an employee found a button and a zipper. The rest had been eaten.
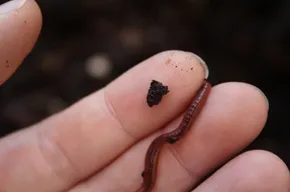
How to separate worm castings from your bin
Sifting vermicompost isn’t hard. It is just slow. You have to be patient.
The good stuff settles at the bottom. It’s called worm castings. To get it, try this trick. Feed the worms heavily on one side of the bin. Go for the top layer. Wait about a week.
The worms will follow the food. They migrate to the fresh supply. Once they are gone, move the bedding from the other side. Start digging into the settled castings. They are waiting there, untouched.
You need a sieve. A simple wooden frame with chicken wire works fine. Some people use kitchen colanders. Any screen material will do.
Place the screen over an empty container. Shake it. The fine worm castings fall through. Larger chunks and any worms stay on top.
Don’t toss those leftovers. Put the worms and organic bits back in the bin. They still have work to do.
What is worm castings really?
You are looking for black gold.
Not oil. Worm poop.
It has many names. Tailings. Solids. Grit. Humus. Even the “latter end of the digestive cycle.” It’s all the same thing.
This isn’t just dirt. It’s concentrated power.
A University of Georgia study showed something shocking. Plants fed with worm castings grew 126 percent faster than those on chemical fertilizers.
Chemicals wash away. Worm castings stay. They feed the soil structure. They hold moisture. They prevent erosion.
Farmers know this. They pay extra for soil high in castings. It’s not just fertilizer. It’s a soil amendment.
Is worm farming profitable?
Composting on a large scale can make money.
People want organic food. They want less waste in landfills. They want to recycle.
Many want to start their own systems. They need worms.
There is a market for live worms and finished castings. It’s a lucrative business.
You need start-up capital. You need marketing. You need patience.
But if you can scale it, it pays off.
Why not start small? Try one bin. See how the worms move. Harvest the castings. Use them on your garden.
The cycle continues. You feed the waste. The worms feed on it. You get the gold.
It’s simple. It’s dirty. It’s effective.
What will you grow with it?

You don’t need a massive warehouse or a mountain lodge to prove that vermicomposting works. The real proof is in the soil. Big players are already on board. IKEA, the Swedish furniture giant, has integrated worm bins into its daily operations. They aren’t just tossing scraps in a dumpster. They run a pilot program that treats cafeteria leavings and office waste as a resource. The setup is industrial but simple. Giant, sterile composting bins sit on mobile platforms. These trucks roll in and out of loading docks with ease. You get your shipment, they take out the compost. No clutter. No delay. Just efficient recycling.
Then there is the Len Foote Hike Inn in Dawsonville, Georgia. This isn’t a factory. It’s a guest house in the woods. But down in the basement, the magic happens. Ten giant worm bins keep busy. They process over 1,500 pounds of waste annually. That’s nearly 700 kilograms of trash turned into black gold every single year. The staff doesn’t just hide the bins. They show guests. They teach sustainable business practices. They help visitors start their own systems. It’s a conversation starter.
Why Homeowners Should Try Vermicomposting
If you’re wondering whether this is worth the effort for your suburban home, consider the scale. You don’t need 10 bins. You need one. But the benefits are identical. Vermicomposting is an underground movement. Thousands of amateurs and pros are singing its praises. The worms are little soil angels. They work while you sleep.
Think about what you throw away. Coffee grounds. Eggshells. Vegetable peels. Paper towels. Credit card receipts (if they are uncoated). All of it becomes fertilizer. Or compost. It’s a fun experiment for the house. It’s also a way to reduce landfill waste significantly.
Want to impress your kids? Let them feed the worms. Want to gross them out? Show them the bin. The result is the same. You end up with nutrient-rich soil. You can use it in your garden. You can sell it. Or you can just keep it for yourself.
Getting Started with Your Own System
You can mimic the Len Foote model on a smaller scale. Start with a bin. Any opaque container will do. Poke holes in the sides for airflow. Line it with moist bedding. Newspaper works well. Shred it up. Add water until it feels like a wrung-out sponge.
Now add the worms. Red wigglers are the standard choice. They eat half their body weight in food daily. Start with a small population. You can always add more. But don’t overfeed them. It’s a common mistake. Rotting food kills the ecosystem. Keep it balanced.
The goal is to let the worms do the heavy lifting. They break down organic matter into castings. This is pure fertilizer. High in nitrogen. High in phosphorus. High in potassium. Better than most store-bought options.
The “Go Fishing” Fallback
Here’s the thing about vermicomposting. It’s not high stakes. If your system fails, you don’t lose money. You lose a batch of worms. You can dump them in the garden. Or you can use them for something else.
If it doesn’t work out — you can always go fishing.
Seriously. The worst-case scenario is you have extra worms. The best-case scenario is you have a garden that grows better than anything you’ve ever grown. Or you’ve helped keep 1,500 pounds of waste out of a landfill.
The technology isn’t complex. The science is simple. Biology does the work. You just provide the environment. Whether you’re IKEA or a homeowner in Ohio, the rules are the same. Feed the worms. Keep the bin moist. Let them work.
There’s a reason the industry is growing. It’s not just about waste reduction. It’s about creating something useful from something useless. It’s about closing the loop. You buy vegetables. You eat them. You compost the scraps. You grow more vegetables. It’s a cycle. A closed loop.
So start small. Get a bin. Add some worms. Watch what happens. The soil will tell you everything you need to know.